How to Craft Armor Stand in Minecraft
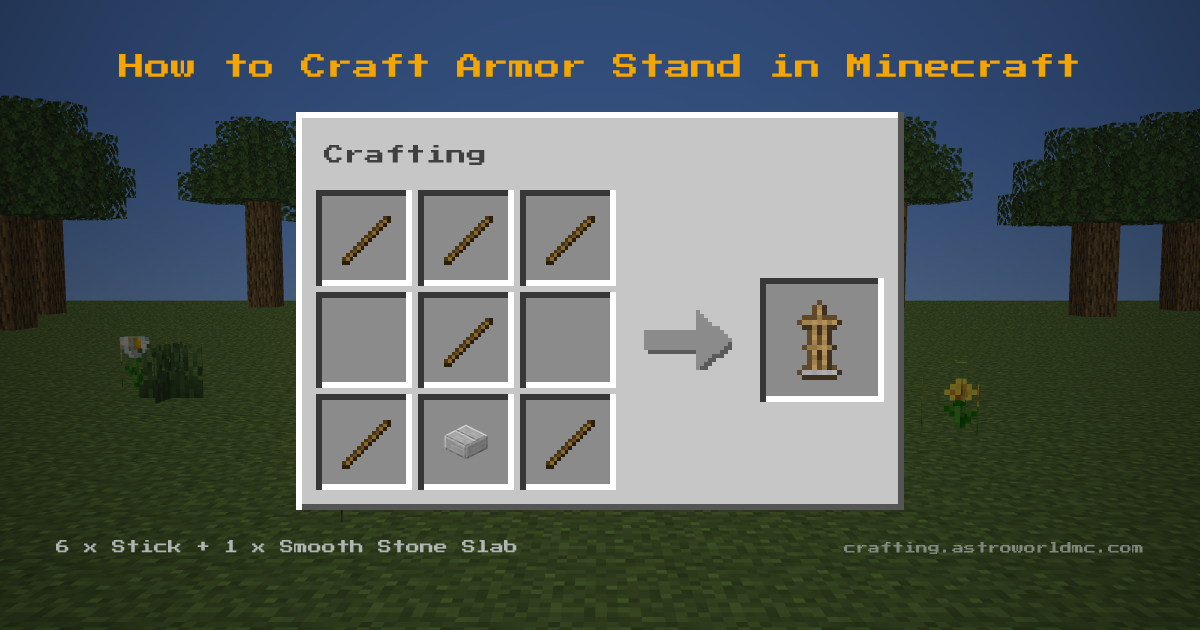
You need 6 Sticks and 1 Smooth Stone Slab, plus a Crafting Table to assemble them on. The top row is three Sticks, the middle row a Stick in the middle column, and the bottom row two Sticks in the left and right columns and a Smooth Stone Slab in the middle column. Expect 1 Armor Stand from every craft. Armor Stands stack to 16 rather than the usual 64.
Armor Stand Item ID and Give Command
The item ID for Armor Stand is minecraft:armor_stand. In commands the namespace may be left off, so armor_stand works too. Checked against Minecraft Java 26.3.
- Give yourself one
/give @p armor_stand- Give a full stack of 16
/give @p armor_stand 16- Give it to a named player
/give Steve armor_stand 1
Cheats have to be on for Armor Stand to appear this way, and the same command works on Bedrock Edition, where the name is written the same.
Overview
Armor Stands display armor and items. They can hold equipment in all armor slots and both hand slots. Armor Stand uses a shaped recipe: the ingredients only work in the pattern shown.
Minecraft has used the name Armor Stand since 1.8, the oldest release whose language file lists it. The recipe itself last changed in Minecraft 1.14. Guides written before that release show a different set of ingredients for the armor stand, so check the grid above rather than the video.
The materials come together from a few sources: you will be working with stick (craft from planks) and smooth stone slab (craft from smooth stone).
Counting The Stack
Feed 6 sticks a craft, so 64 covers 10 of them: 10 armor stands. Have 10 smooth stone slabs ready as well. Left behind: 4 sticks.
Materials Needed
For Armor Stand: 6x Stick (craft from planks) and Smooth Stone Slab (craft from smooth stone), brought to a Crafting Table.
The Full Chain
4 Planks makes 8 Stick, the one part of this you craft rather than gather. All in: 1 Smooth Stone Slab and 4 Planks.
- 1
- 2
 Armor Standthis page
Gather this first
Step-by-Step Instructions
- 1
 6x Stick
 - 2
Smooth Stone Slab
- 3
Armor Stand
Tips & Notes
- Shopping list: 6x Stick and 1x Smooth Stone Slab. Plan the Stick first: craft from planks.
Uses for Armor Stand
- Displaying armor sets
- Holding items in off-hand and head slots
- Decoration
View detailed item stats, durability and properties for Armor Stand on the Astroworld Items Database.
Frequently Asked Questions
What do I need to craft an Armor Stand in Minecraft?
What do you need to make an Armor Stand from scratch?
Can you craft an Armor Stand without a crafting table?
Where do you find the materials for an Armor Stand?
How many Armor Stands do you get from one craft?
What is the item ID for Armor Stand in Minecraft?
What is the give command for Armor Stand?
Is the Armor Stand recipe the same in Java and Bedrock Edition?
How many times do you repeat each step for an Armor Stand?
How many Armor Stands fit in one stack?
What version of Minecraft added the Armor Stand?
Sources
- Grid, ingredients and yield
- 6 Sticks and 1 Smooth Stone Slab in, 1 Armor Stand out, Crafting Table. Java 26.3, .
- That Bedrock agrees
- Bedrock 1.26.50.4, same 2 ingredients.
- How far back it goes
- Java 1.8 is the earliest release that calls it this. From all 163 released Java clients, rd-132211 to 26.2.
- When the recipe last changed
- Compared release by release across 50 Java releases since 1.13; the last change to what it takes was in 1.14.
- Stack size
- The Astroworld Items Database, built from the same jar.
- The recipe book unlock
- What unlocks it in the recipe book. Java 26.3.
- The stack sum
- Counted, not played: 1 Armor Stand per craft against the stack size.


